Histórico da Página
| HTML |
|---|
<div id="main-content" class="wiki-content group">
<h1 id="FluigAPI-Índice">Index</h1>
<p>
<style type='text/css'>/*<![CDATA[*/
div.rbtoc1412695590834 {
padding: 0px;
}
div.rbtoc1412695590834 ul {
list-style: none;
margin-left: 0px;
}
div.rbtoc1412695590834 li {
margin-left: 0px;
padding-left: 0px;
}
/*]]>*/
</style>
<div class='toc-macro rbtoc1412695590834'>
<ul class='toc-indentation'>
<li><span class='TOCOutline'>1</span> <a
href='#FluigAPI-Objetivo'>Objective</a>
<ul class='toc-indentation'>
<li><span class='TOCOutline'>1.1</span> <a
href='#FluigAPI-OAuth'>OAuth</a></li>
<li><span class='TOCOutline'>1.2</span> <a
href='#FluigAPI-CadastraraplicativonoFluig'>Register
application on Fluig</a></li>
<li><span class='TOCOutline'>1.3</span> <a
href='#FluigAPI-AplicaçãodeExemplo'>Example application</a></li>
</ul></li>
</ul>
</div>
</p>
<h1 id="FluigAPI-Objetivo">Objective</h1>
<p>This document is intended for developers who want to create
applications external to Fluig. Fluig has a public API and its main
services are available on the platform. By using this API, you can
create messages on behalf of the user, add contacts as favorites,
create articles and much more. For the applications to act on behalf
of the user the authorization is performed through the OAuth protocol.</p>
<p>
<span
style="color: rgb(0, 0, 0); font-size: 1.8em; font-weight: bold; line-height: normal;">API</span>
</p>
<p>
<span style="color: rgb(34, 34, 34);">API</span><em><span
style="color: rgb(34, 34, 34);">(Application Programming
Interface)</span></em><span style="color: rgb(34, 34, 34);"> is a set of
routines and standards set by the software so that external
applications can use its resources in their applications.</span><span
style="color: rgb(34, 34, 34); font-size: 10.0pt; line-height: 13.0pt;"> </span>
</p>
<p>
<span style="color: rgb(34, 34, 34);">In Fluig, the API
documentation is available at</span><span style="color: rgb(34, 34, 34);">
http://<FluigServer>/api </span><span style="color: rgb(34, 34, 34);">or
</span><a href="http://api.fluig.com" class="external-link" rel="nofollow"><span
style="color: rgb(17, 85, 204); text-decoration: underline;">here</span></a><span
style="color: rgb(34, 34, 34);">.</span>
</p>
<p>
<span style="color: rgb(34, 34, 34);">All services are based on
<strong>REST</strong>, where writing actions are limited to HTTP
</span><strong><span style="color: rgb(34, 34, 34);">POST</span></strong><span
style="color: rgb(34, 34, 34);"> request type, and query
actions are limited to </span><strong><span
style="color: rgb(34, 34, 34);"> GET.</span></strong><strong
style="font-size: 10.0pt; line-height: 13.0pt;"><span
style="color: rgb(34, 34, 34);"> </span></strong>
</p>
<div class="aui-message warning shadowed information-macro">
<p class="title">Note:</p>
<span class="aui-icon icon-warning">Icon</span>
<div class="message-content">
<p>
<span style="color: rgb(38, 38, 38);">Available from Fluig <strong>1.1</strong>version
</span>
</p>
</div>
</div>
<h3 id="FluigAPI-OAuth">OAuth</h3>
<p>
<span style="color: rgb(34, 34, 34);">Authentication and
authorization of external applications to Fluig is performed via
the protocol</span><span
style="color: rgb(17, 85, 204); text-decoration: underline;"><a
href="http://oauth.net/core/1.0a/" class="external-link"
rel="nofollow">OAuth</a> 1.0</span> and <a
href="http://oauth.net/core/1.0a/" class="external-link"
rel="nofollow">OAuth 1.0a</a> <span
style="color: rgb(34, 34, 34);">, </span><span
style="color: rgb(34, 34, 34);">which enables applications to
perform actions on behalf of the user without storing their login
information (username/password). You can also use the Fluig API
through a valid session in the internet browser</span><span
style="color: rgb(34, 34, 34);">.</span>
</p>
<p>
<span style="color: rgb(34, 34, 34);"><img
class="confluence-embedded-image confluence-external-resource image-right"
width="100"
src="https://lh6.googleusercontent.com/zeput87tfEe0mreaYKPTHyVDF4yVDBYMO1B2L3TtAncTWFNLv5iE59ulRMx58uW619aSkxQddzwtfEQgNFh0wmjSnXUjveCqS7YanKfTZjsV9ej8YPByeXbY"
data-image-src="https://lh6.googleusercontent.com/zeput87tfEe0mreaYKPTHyVDF4yVDBYMO1B2L3TtAncTWFNLv5iE59ulRMx58uW619aSkxQddzwtfEQgNFh0wmjSnXUjveCqS7YanKfTZjsV9ej8YPByeXbY"></span>
</p>
<div class="aui-message warning shadowed information-macro">
<p class="title">Note:</p>
<span class="aui-icon icon-warning">Icon</span>
<div class="message-content">
<p>
<span style="color: rgb(34, 34, 34);">Fluig is <strong>not</strong>
compatible with the OAuth 2.0 protocol.
</span>
</p>
<div>
<span style="color: rgb(34, 34, 34);"><br /></span>
</div>
</div>
</div>
<p> </p>
<p>
<span style="color: rgb(0, 0, 0);">Authentication process:</span>
</p>
<p>
<span style="color: rgb(0, 0, 0);">For an application to act in
Fluig on behalf of a user or of itself it has to be previously
registered on the Fluig platform with its public and private keys. As
soon as the application is registered in Fluig it is possible to
start the authentication process as steps below:</span>
</p>
<ul>
<li><span style="color: rgb(0, 0, 0);"> <strong>Step
1: </strong>Application requests a token from Fluig to start an OAuth
session (<em><span style="color: rgb(34, 34, 34);">http://<ServerFluig>/portal/api/rest/oauth/request_token</span></em>)
</span></li>
<li><span style="color: rgb(0, 0, 0);"> <strong>Step
2: </strong>Application requests user authorization through login and
password (<em><span style="color: rgb(34, 34, 34);">http://<ServerFluig>/portal/api/rest/oauth/authorize</span></em>)
</span></li>
<li><span style="color: rgb(0, 0, 0);"> <strong>Step
3: </strong>Application requests Fluig<strong> </strong>tokens to
act on behalf of the user (<em><span
style="color: rgb(34, 34, 34);">http://<ServerFluig>/portal/api/rest/oauth/access_token</span></em>)<strong> </strong></span></li>
</ul>
<p>
<span style="color: rgb(34, 34, 34);"><span><span
style="color: rgb(0, 0, 0);"> </span></span></span>
</p>
<div>
<img class="confluence-embedded-image image-center" width="500"
src="attachments/89621623/96010289.png"
data-image-src="attachments/89621623/96010289.png">
</div>
<div style="text-align: center;">
<strong>Figure 1 - OAuth example</strong>
</div>
<p> </p>
<div class="aui-message warning shadowed information-macro">
<p class="title">Note:</p>
<span class="aui-icon icon-warning">Icon</span>
<div class="message-content">
<p>
<span style="color: rgb(34, 34, 34);">To use the application,
it must be previously registered in Fluig.</span>
</p>
</div>
</div>
<h3 id="FluigAPI-CadastraraplicativonoFluig">Register application
in Fluig</h3>
<p>
<span><span style="color: rgb(34, 34, 34);">To register
an application in Fluig log in as Fluig administrator.</span></span>
</p>
<p>Follow the steps:</p>
<a name="composition-deck-samples"></a>
<div id="samples" class="deck" history="false" loopcards="false"
effecttype="fade" effectduration="0.5" nextafter="0.0">
<ul class="tab-navigation"></ul>
<!-- // .tab-navigation -->
<div class="deck-cards panel" style="">
<div id="1" class="deck-card active-pane" style="" cssclass=""
accesskey="" label="Passo1" title="" nextafter="0"
effecttype="default" effectduration="-1.0">
<p> </p>
<ul>
<li><p>
<span><span style="color: rgb(34, 34, 34);">Go to:
</span><em><span style="color: rgb(34, 34, 34);">Control
panel/WCM/ProviderOauth</span></em></span>
</p></li>
</ul>
<p style="text-align: center;">
<span><img
class="confluence-embedded-image confluence-external-resource confluence-content-image-border"
width="500"
src="https://lh6.googleusercontent.com/z6GEysJ7DEkocYEgAZqjaMPfKYHXK1Xhaa_NI7GmQxxbQO-1twl9ciZiEkdM5YW3PeeMQy2mf08AZivip93TY6SvE1CLt4zlSaMAGqBIaFVoAOqHeDbXKVFi"
data-image-src="https://lh6.googleusercontent.com/z6GEysJ7DEkocYEgAZqjaMPfKYHXK1Xhaa_NI7GmQxxbQO-1twl9ciZiEkdM5YW3PeeMQy2mf08AZivip93TY6SvE1CLt4zlSaMAGqBIaFVoAOqHeDbXKVFi"></span>
</p>
<p style="text-align: center;">
<strong><strong style="text-align: center;">Figure
2 - </strong>Fluig administrative panel</strong>
</p>
<p> </p>
<p style="text-align: center;"> </p>
</div>
<div id="2" class="deck-card " style="" cssclass="" accesskey=""
label="Passo 2" title="" nextafter="0" effecttype="default"
effectduration="-1.0">
<p> </p>
<div>
<ul>
<li><p>
<span><span style="color: rgb(34, 34, 34);">Click
Add and fill in the fields as shown:</span></span>
</p>
<p>
<span><img
class="confluence-embedded-image confluence-external-resource confluence-content-image-border image-center"
width="500"
src="https://lh6.googleusercontent.com/shwMGB8-EPw0aQ6Mu2qdV_cWViaZ8u-mANysKLdS1fZoM0RYmxp7PefmPVHOneTS5u90NWqc41Ugmx-PATVSJGuDeVNTKXrx9-VSE9x_yVwNLNjMAK8mGnud"
data-image-src="https://lh6.googleusercontent.com/shwMGB8-EPw0aQ6Mu2qdV_cWViaZ8u-mANysKLdS1fZoM0RYmxp7PefmPVHOneTS5u90NWqc41Ugmx-PATVSJGuDeVNTKXrx9-VSE9x_yVwNLNjMAK8mGnud"></span>
</p>
<p style="text-align: center;">
<span style="color: rgb(34, 34, 34);"><strong>Figure
3 - Oauth provider registration</strong> </span>
</p>
<p>
<span style="color: rgb(34, 34, 34);">Details:</span>
</p>
<div class="table-wrap">
<table class="confluenceTable">
<tbody>
<tr>
<th class="confluenceTh">Field</th>
<th class="confluenceTh">Example</th>
</tr>
<tr>
<td class="confluenceTd"><span
style="color: rgb(43, 43, 43);">Code</span></td>
<td class="confluenceTd">01</td>
</tr>
<tr>
<td class="confluenceTd"><span
style="color: rgb(43, 43, 43);">OAuth Provider</span></td>
<td class="confluenceTd">WCM</td>
</tr>
<tr>
<td class="confluenceTd"><span
style="color: rgb(43, 43, 43);">Description</span></td>
<td class="confluenceTd"><span
style="color: rgb(43, 43, 43);">Example application</span></td>
</tr>
<tr>
<td class="confluenceTd"><span
style="color: rgb(43, 43, 43);">Access token URL</span></td>
<td class="confluenceTd"><p>
<span style="color: rgb(34, 34, 34);">http://<ServerFluig>/portal/api/rest/oauth/access_token</span>
</p>
<div>
<span style="color: rgb(34, 34, 34);"><br /></span>
</div></td>
</tr>
<tr>
<td class="confluenceTd"><span
style="color: rgb(43, 43, 43);">Request token URL</span></td>
<td class="confluenceTd"><p>
<span style="color: rgb(34, 34, 34);">http://<ServerFluig>/portal/api/rest/oauth/request_token</span><span
style="color: rgb(43, 43, 43);"> </span>
</p>
<div>
<span style="color: rgb(34, 34, 34);"><br /></span>
</div></td>
</tr>
<tr>
<td class="confluenceTd"><span
style="color: rgb(43, 43, 43);">User authorization
URL</span></td>
<td class="confluenceTd"><span
style="color: rgb(43, 43, 43);"> </span><span
style="color: rgb(34, 34, 34);">http://<ServerFluig>/portal/api/rest/oauth/authorize</span></td>
</tr>
<tr>
<td class="confluenceTd"><span
style="color: rgb(43, 43, 43);">Request method</span></td>
<td class="confluenceTd"><span
style="color: rgb(43, 43, 43);">GET</span></td>
</tr>
<tr>
<td class="confluenceTd"><span
style="color: rgb(43, 43, 43);">Signature method</span></td>
<td class="confluenceTd"><span
style="color: rgb(43, 43, 43);">HMAC-SHA1 </span></td>
</tr>
</tbody>
</table>
</div>
<p>
<span style="color: rgb(34, 34, 34);"><br /></span>
</p></li>
</ul>
<p style="text-align: center;"> </p>
</div>
</div>
<div id="3" class="deck-card " style="" cssclass="" accesskey=""
label="Passo 3" title="" nextafter="0" effecttype="default"
effectduration="-1.0">
<p> </p>
<ul>
<li><p>
<span style="color: rgb(43, 43, 43);">Go back to the
control panel and go to: </span><span style="color: rgb(34, 34, 34);">Control
panel/WCM/Oauth app</span>
</p>
<p>
<span
style="color: rgb(34, 34, 34); font-size: 10.0pt; line-height: 13.0pt;">Click
Add and fill in the fields as shown:</span>
</p>
<div>
<span style="color: rgb(34, 34, 34);"><br /></span>
</div></li>
</ul>
<p>
<span><img
class="confluence-embedded-image confluence-external-resource confluence-content-image-border image-center"
width="500"
src="https://lh4.googleusercontent.com/m4MpHxaK702g0JL25AhI32CQwmg6oTjjtE451r-FRr2u3S4atPjPTHrwks3COKnt65bq3wOVKPMF3_kOmhlLYmtsSIOXB8gXRO6iV9SSJtoLVofNnqyheGTq"
data-image-src="https://lh4.googleusercontent.com/m4MpHxaK702g0JL25AhI32CQwmg6oTjjtE451r-FRr2u3S4atPjPTHrwks3COKnt65bq3wOVKPMF3_kOmhlLYmtsSIOXB8gXRO6iV9SSJtoLVofNnqyheGTq"></span>
</p>
<p style="text-align: center;">
<strong style="text-align: center;">Figure 4 – Oauth
application registration</strong><span style="color: rgb(34, 34, 34);"> </span>
</p>
<p style="text-align: left;">
<span style="color: rgb(34, 34, 34);">Details:</span>
</p>
<div class="table-wrap">
<table class="confluenceTable">
<tbody>
<tr>
<th class="confluenceTh">Fields</th>
<th class="confluenceTh">Example</th>
</tr>
<tr>
<td class="confluenceTd"><span><span
style="color: rgb(34, 34, 34);"> </span><span
style="color: rgb(43, 43, 43);">Consumer key</span></span></td>
<td class="confluenceTd"><p>
<span style="color: rgb(43, 43, 43);"><your
application public key></span>
</p></td>
</tr>
<tr>
<td class="confluenceTd"><span><span
style="color: rgb(43, 43, 43);">OAuth Provider</span></span></td>
<td class="confluenceTd"><p>
<span style="color: rgb(43, 43, 43);">Provider
registered in step 2</span>
</p></td>
</tr>
<tr>
<td class="confluenceTd"><span><span
style="color: rgb(43, 43, 43);">Consumer secret</span></span></td>
<td class="confluenceTd"><span><span
style="color: rgb(43, 43, 43);"><your application
secret key></span></span></td>
</tr>
</tbody>
</table>
</div>
<p style="text-align: center;">
<strong><br /></strong>
</p>
</div>
<div id="4" class="deck-card " style="" cssclass="" accesskey=""
label="Passo 4" title="" nextafter="0" effecttype="default"
effectduration="-1.0">
<p> </p>
<ul>
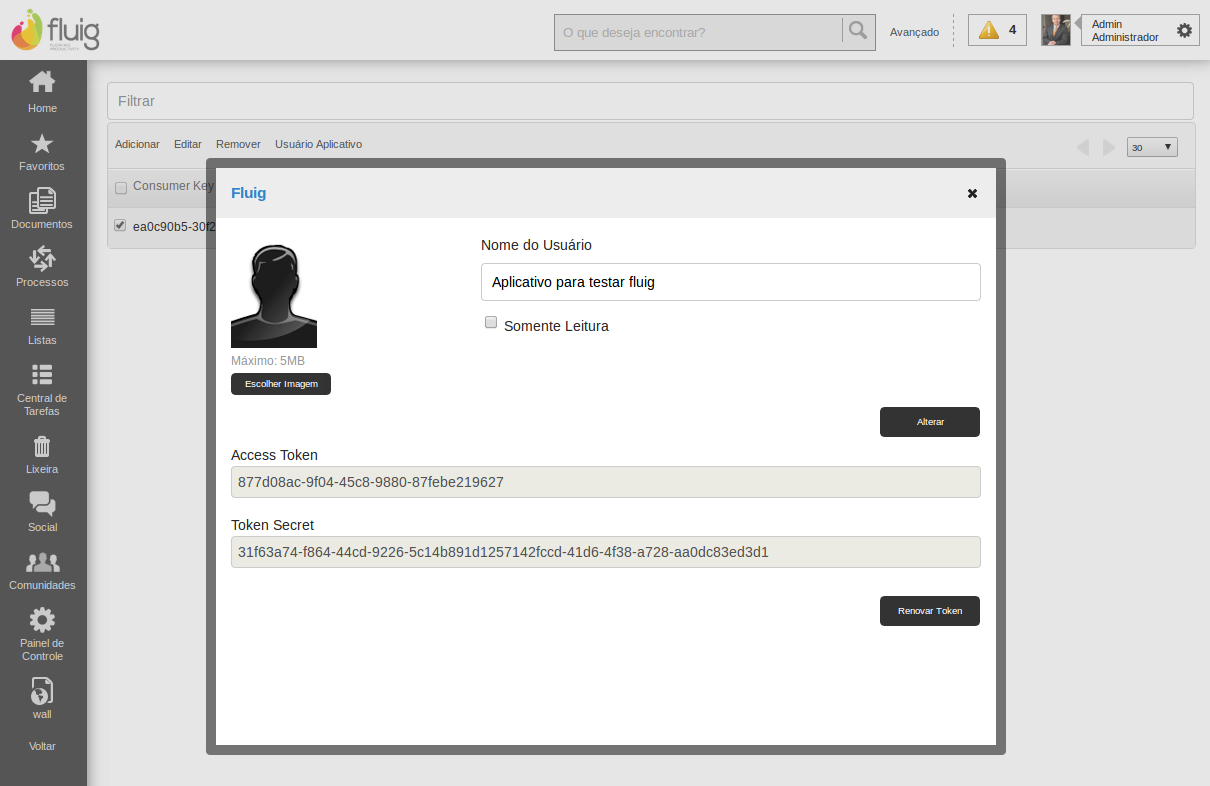
<li><span><span style="color: rgb(43, 43, 43);">Optional:
If your application performs actions on its behalf, you can
create a user application. On the same application registration
screen there is an "</span><span style="color: rgb(43, 43, 43);">Application
user</span><span style="color: rgb(43, 43, 43);">" action: after
accessing it, you will be able to generate </span><span
style="color: rgb(43, 43, 43);"> tokens</span><span
style="color: rgb(43, 43, 43);"> that are exclusive for
the application. If your application's actions should be
executed on behalf of a user, then the application must go
through the standard OAuth authentication process.</span></span></li>
</ul>
<p>
<span><img
class="confluence-embedded-image confluence-external-resource image-center"
width="500"
src="https://lh4.googleusercontent.com/abCZrBXOGOQ02j1HunoZF2RKzemoUKTqqvDyrQsy5_T18BiuAyhx9irIclzNkGjBPeWEnJ_KHL58vQ9XWf3vN6tpzS0ZYOaaZtdf6W_XKmr_o93EA567v1u9"
data-image-src="https://lh4.googleusercontent.com/abCZrBXOGOQ02j1HunoZF2RKzemoUKTqqvDyrQsy5_T18BiuAyhx9irIclzNkGjBPeWEnJ_KHL58vQ9XWf3vN6tpzS0ZYOaaZtdf6W_XKmr_o93EA567v1u9"></span>
</p>
<p style="text-align: center;">
<span><strong style="text-align: center;">Figure 5
- application user</strong></span>
</p>
</div>
</div>
</div>
<!-- // .deck -->
<h3 id="FluigAPI-AplicaçãodeExemplo">Example application</h3>
<p>There is an application developed by the Fluig team that shows
how to use the API. The application is developed in Java. You have to
have JDK 1.7 installed before running the application. Build and
dependencies management is made by Maven, so it is mandatory to have
it installed in the development environment to be used.</p>
<p>
<a href="attachments/89621623/90570761.zip">fluig-client-demo.zip</a>
</p>
<p>Download the file and unzip it into a directory of your choice.</p>
<p>
The project basically consists of a pom.xml (<em>Project Object
Model</em>, Maven standard file) and a Java class called 
<code>
<strong>FluigClientExample</strong>
</code>
. Open the class and check the documentation generated from comments.
You will see that it is necessary to build an object 
<code>
<strong>FluigClient</strong>
</code>
and this object receives some parameters such as host, consumer key
and consumer secret. <span
style="font-size: 10.0pt; line-height: 13.0pt;">You should
change the values in the construction to a known host and enter the
consumer key and secret of the application that is your
responsibility, as the code that follows:</span>
</p>
<div class="code panel pdl" style="border-width: 1px;">
<div class="codeContent panelContent pdl">
<pre class="theme: Confluence; brush: java; gutter: false"
style="font-size: 12px;"> FluigClient fluig = new FluigClient()
.setHost ("http://127.0.0.1:8080")
.setConsumerKey ("enter your consumer key here")
.setConsumerKey ("enter your consumer secret here")
.connect();</pre>
</div>
</div>
<p>
<span style="font-size: 10.0pt; line-height: 13.0pt;">Further
down in the code, note that the application creates and reads posts
by communities. You have to enter a valid community of your
environment to run the demo application;</span>
</p>
<div class="code panel pdl" style="border-width: 1px;">
<div class="codeContent panelContent pdl">
<pre class="theme: Confluence; brush: java; gutter: false"
style="font-size: 12px;">String communityAlias = "enter_here_alias_of_some_community";</pre>
</div>
</div>
<p>
<span style="font-size: 10.0pt; line-height: 13.0pt;">After
performing the changes, open the directory generated and you will
notice that the pom.xml file is located in the root of the project.</span>
</p>
<p>To perform the build of the project, type:</p>
<div class="code panel pdl" style="border-width: 1px;">
<div class="codeContent panelContent pdl">
<pre class="theme: Confluence; brush: bash; gutter: false"
style="font-size: 12px;">$ mvn clean install</pre>
</div>
</div>
<p>During the build process, Maven will display several logs, such
as dependencies being downloaded among others.</p>
<p>
After build is successfully finished, note that the file
<code>
<strong>target/api-client-demo-jar-with-dependencies.jar</strong>
</code>
generated is an executable Java. To execute it, type the command:
</p>
<div class="code panel pdl" style="border-width: 1px;">
<div class="codeContent panelContent pdl">
<pre class="theme: Confluence; brush: bash; gutter: false"
style="font-size: 12px;">$ java -jar target/api-client-demo-jar-with-dependencies.jar</pre>
</div>
</div>
<p>
In
<code>
<strong>FluigClientExample</strong>
</code>
class, note that the execution will: list the users, create a post on
the user's personal page, create a post in a community and list the
posts of a community. During the execution, the call result logs will
be displayed on the console.
</p>
<p> </p>
<p> </p>
</div>
|
Índice
| Índice | ||||||
|---|---|---|---|---|---|---|
|
Objetivo
Este documento se direcciona a desarrolladores que desean crear aplicaciones externas al Fluig. El Fluig posee una API Pública con los principales servicios disponibles en la plataforma. A través de esta API es posible crear mensajes en nombre del usuario, agregar contacto como favorito, crear artículos y mucho más. Para que las aplicaciones puedan actuar en nombre del usuario, la autorización se realiza a través del protocolo OAuth.
API
API, de Application Programming Interface (Interfaz de Programación de Aplicaciones) es un conjunto de rutinas y estándares establecidos por el software para que aplicaciones externas puedan utilizar sus recursos en sus aplicaciones.
En el Fluig, la documentación de la API está disponible en http://<FluigServer>/api o aquí.
Todos los servicios se basan en REST, donde acciones de escritura se limitan a las solicitudes HTTP del tipo POST, y acciones de consulta a solicitudes del tipo GET.
| Nota | ||
|---|---|---|
| ||
Disponible a partir de la versión 1.1 del Fluig |
OAuth
La autenticación y autorización de aplicaciones externas al Fluig se realiza a través del protocolo OAuth 1.0 y OAuth 1.0a , que posibilita que las aplicaciones ejecuten acciones en nombre del usuario sin almacenar sus datos de acceso (usuario/contraseña). También es posible utilizar la API del Fluig a través de una sesión válida, en el navegador de internet.
...
| title | Observación |
|---|
El Fluig no es compatible con el protocolo OAuth 2.0
Proceso de autenticación:
Para que una aplicación consiga actuar en el Fluig en nombre de un usuario o en nombre propio es necesario que el mismo esté previamente registrado en la plataforma Fluig con sus claves pública y privada. Cuando la aplicación está previamente registrada en el Fluig es posible iniciar el proceso de autenticación conforme a las etapas a seguir:
- Etapa 1: La aplicación solicita al Fluig token que inicie una sesión OAuth (http://<ServerFluig>/portal/api/rest/oauth/request_token)
- Etapa 2: La aplicación solicita autorización del usuario a través de login y contraseña (http://<ServerFluig>/portal/api/rest/oauth/authorize)
- Etapa 3: La aplicación solicita al Fluig tokens para actuar en nombre del usuario (http://<ServerFluig>/portal/api/rest/oauth/access_token)

Figura 1 - Ejemplo OAuth
| Nota | ||
|---|---|---|
| ||
Para utilizarla, la aplicación debe estar previamente registrada en el Fluig. |
Registrar aplicación en el Fluig
Para registrar una aplicación en el Fluig haga el login como Administrador del Fluig.
Siga los siguientes pasos:
...
| effectDuration | 0.5 |
|---|---|
| id | samples |
| history | false |
| effectType | fade |
| Card | ||||||
|---|---|---|---|---|---|---|
| ||||||
Figura 2 - Panel administrativo Fluig
|

...
| id | 2 |
|---|---|
| label | Passo 2 |
Haga clic en agregar y rellene los campos conforme a la imagen:

Figura 3 - Registro de proveedor Oauth
Detalles:
...
Campo.
...
Ejemplo
...
http://<ServerFluig>/portal/api/rest/oauth/access_token
...
http://<ServerFluig>/portal/api/rest/oauth/request_token
...
...
| id | 3 |
|---|---|
| label | Passo 3 |
Regrese al panel de control y vaya a: Panel de control/WCM/Oauth App
Haga clic en agregar y rellene los campos conforme a la imagen:

Figura 4 - Registro de aplicación Oauth
Detalles:
Campos | Ejemplo |
|---|---|
| Consumer Key | <clave pública de su aplicación> |
| OAuth Provider | Proveedor registrado en el Paso 2 |
| Consumer Secret | <clave secreta de su aplicación> |
| Card | ||||
|---|---|---|---|---|
| ||||
Figura 5 - usuario aplicación |
Aplicación de Ejemplo
Existe una aplicación desarrollada por el equipo del Fluig que muestra cómo usar la API. La aplicación está desarrollada en Java. Usted debe poseer el JDK 1.7 instalado para ejecutar la aplicación. La gestión de build y de dependencias es realizada por el Maven, entonces es obligatorio tenerlo instalado en el ambiente de desarrollo que se utilizará.
Descargue el archivo y descomprímalo en un directorio de su preferencia.
El proyecto básicamente consiste en un pom.xml (Project Object Model, archivo estándar del Maven) y una clase Java llamada FluigClientExample. Abrir la clase y comprobar la documentación generada de comentarios. Usted verá que es necesario construir un objeto FluigClient y este objeto recibe algunos parámetros como host, consumer key y consumer secret. Usted debe modificar los valores pasados en la construcción para un host conocido e informar el consumer key y secret de la aplicación de su responsabilidad, conforme al código a seguir:
| Bloco de código | ||
|---|---|---|
| ||
		FluigClient fluig = new FluigClient()
				.setHost("http://127.0.0.1:8080")
				.setConsumerKey("informe aquí su consumer key")
				.setConsumerSecret("informe aquí su consumer secret")
.connect(); |
Más abajo en el código, podemos reparar que la aplicación crea y lee posts de comunidades. Usted debe informar una comunidad válida de su ambiente para ejecutar la aplicación demostración;
| Bloco de código | ||
|---|---|---|
| ||
String comunidadeAlias = "coloque_aqui_alias_de_alguma_comunidade"; |
Después de realizar las modificaciones, entre en el directorio generado y usted notará que el archivo pom.xml se localiza en la raíz del proyecto.
Para realizar el build del proyecto, digite:
| Bloco de código | ||
|---|---|---|
| ||
$ mvn clean install |
Durante el proceso de build el Maven exhibirá varios logs, como dependencias que se descargan, entre otros.
Después del build finalizado con éxito, fíjese que el archivo target/api-client-demo-jar-with-dependencies.jar se generó, este archivo es un ejecutable Java. Para ejecutarlo digite el comando:
| Bloco de código | ||
|---|---|---|
| ||
$ java -jar target/api-client-demo-jar-with-dependencies.jar |
Si usted se fija en la clase FluigClientExample, la ejecución: listará los usuarios, creará una publicación en la página personal del usuario, crear una publicación en una comunidad y listar las publicaciones de una comunidad. Durante la ejecución los logs de los resultados de las llamadas se exhibirán en la consola.
...
Visão Geral
Import HTML Content
Conteúdo das Ferramentas
Tarefas