01. OVERVIEW
Set of features for the client to manage financial activities in an agile way with a modern interface.
Attention
This set of features is available only in the release 12.1.33
02. CONFIGURATION
REST ADVPL
- Add sections to the appserver.ini according to this example.
Further information on this configuration, access the page Application Server - REST ADVPL.
AppServer.ini
[HTTPV11]
Enable=1
Sockets=HTTPREST

[HTTPREST]
Port=8084
URIs=URIHTML
SECURITY=1

[URIHTML]
URL=/html-protheus/rest
PrepareIn=All
Instances=2,2
CORSEnable=1
AllowOrigin=*

[ONSTART]
jobs=HTTPJOB
RefreshRate=30

[HTTPJOB]
MAIN=HTTP_START
ENVIRONMENT=environment
HTTP Section
- Add sections to the appserver.ini according to this example.
- Extract project built in the directory set in the HTTP section.
- Edit the appConfig.json file, serverBackend edited according to IP and REST - ADVPL Port set, according to the example below.
Further information on this configuration, access the page Application Server - Seção HTTP.
AppServer.ini
[HTTP]
enable=1
port=8080
path=D:\TOTVS\Protheus_Data\web\portal-cliente
defaultpage=index.html
appConfig.json
{
  "name": "Portal do Cliente",
  "version": "12.1.27-0.1.0",
  "serverBackend": "http://localhost:8084/",
  "restEntryPoint": "",
  "versionAPI": "",
  "productLine": "Protheus"
}
Mingle
Mingle is the platform available as service to support TOTVS applications. It resolves three main customers' needs, Authentication, API Gateway and Metrics. It does this without the products having to expose their APIs directly, allowing applications to consume them in a controllable way. For further information access the TDN page.
For the Customer Portal access, request a single ALIAS according to these steps:
Access link Mingle, click "Request Alias", and fill it out according to the image below:

Where:
- E-mail: e-mail address linked to the Mingle registration.
- Select App: select "Customer Portal".
- Select backend: enter the backend public address, according to the configurations previously set.
- Server Name: identification of the server in the Mingle.
- Register/Edit companies and branches: enter company and base branch code for the backend (see example below).
- Register authentication accreditation: enter Protheus password and login the authentication base user in the Mingle (see example below).


Wait the return via e-mail with the ALIAS created and other information.
These parameters must be updated with data received by the Mingle team:
- MV_MINGTOK: Access Token for requests to Mingle.
- MV_MINGIUS: User Login used in the Authentication Accreditation.
03. REGISTRATIONS
WEB SERVICES
Registration in charge of the Portal WebServices maintenance, routine FATA230, available in these modules
- SIGAFAT (5)
- SIGATCF (18)
- SIGARSP (20)
- SIGATEC (28)
- SIGAPLS (33)
- SIGATMS (43)
- SIGAPMS (44)
- SIGAGAC (59)
- SIGAVDF (86)
Access the Portal User routine (FATA220), the Web Service is added to all branches of the Companies Group with the Web Service code "PORTALCLIENTE".

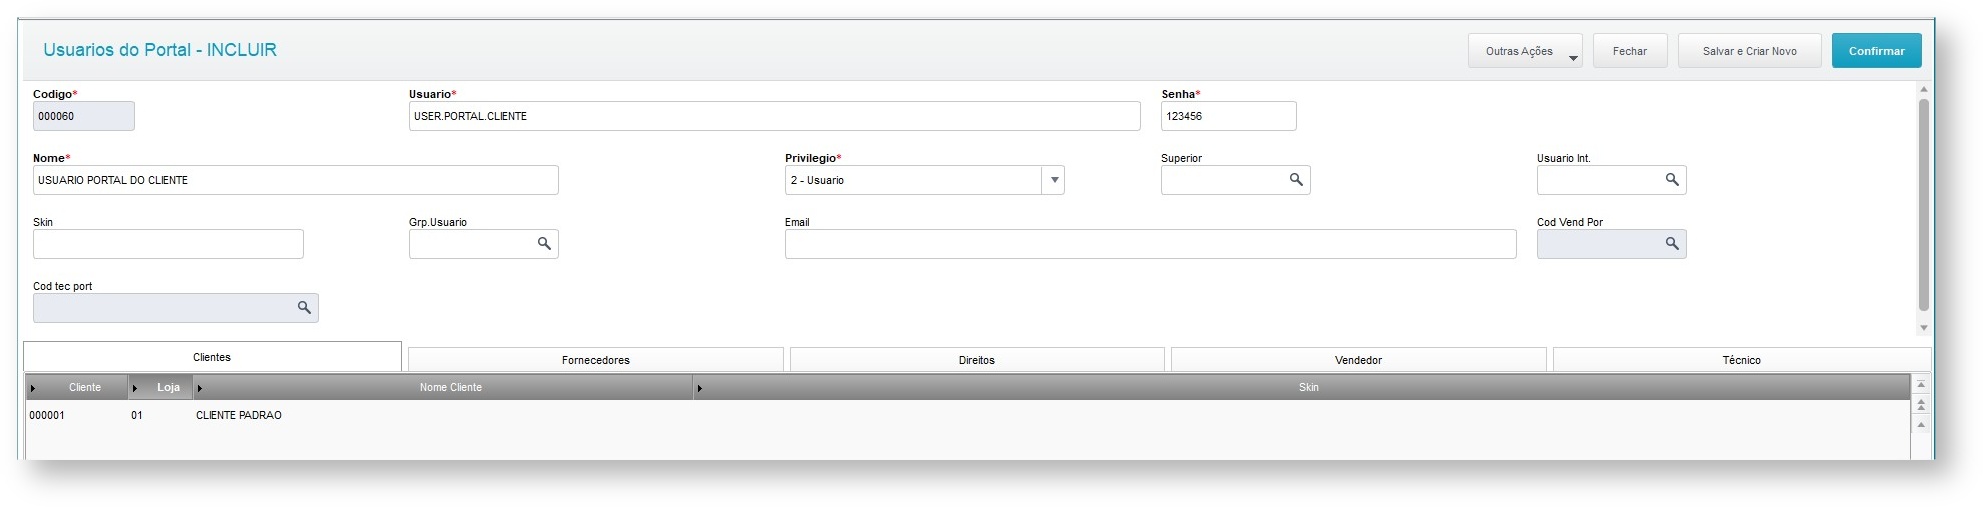
PORTAL USERS
Registration in charge of the Portal Users maintenance, routine FATA220, available in these modules:
- SIGAFAT (5)
- SIGATCF (18)
- SIGATEC (28)
- SIGAPLS (33)
- SIGATMS (43)
- SIGAPMS (44)
- SIGAGAC (59)
- SIGAVDF (86)
The system displays the addition window, split in header and items.
In the upper part header, user identification data are displayed. Note the following fields:
User
Enter the text identifying the user in the Portal.
Password
Enter user password. Even if this user has group privilege, the creation of a group password is required, as it is the password the group admin will use for maintenance.
Name
Enter the user name created.
Privilege
Enter the user type as follows:
User - regular user who can access the portal with the rights set on this screen;
Administrator - user with administration rights, being able to create/edit/delete new users in the portal;
Group - User that behaves like a group; will facilitate the assignment of rights to the users who will be part of the group.
Internal User
In case this user is a company’s employee, such as a sales rep, technician etc., link this employee to an internal user.
Users Group
To link this user to a group, click Research to select user, and then click Load Rights so all group’s rights are inherited.
You must confirm to overwrite the user’s rights for the group’s rights.
In the items area, define which customers this user will have access to, as the data that will be viewed in the Customer Portal are from previously selected customers.
Login and Password must be repeated in all branches to which the user has access, because the User’s registration of the Portal is exclusive among branches.
When adding, editing or deleting a Portal User using the tab “Rights”, the “PORTALCLIENTE” related to the Mingle will be integrated to the user platform according to the operation executed.

04. FEATURES
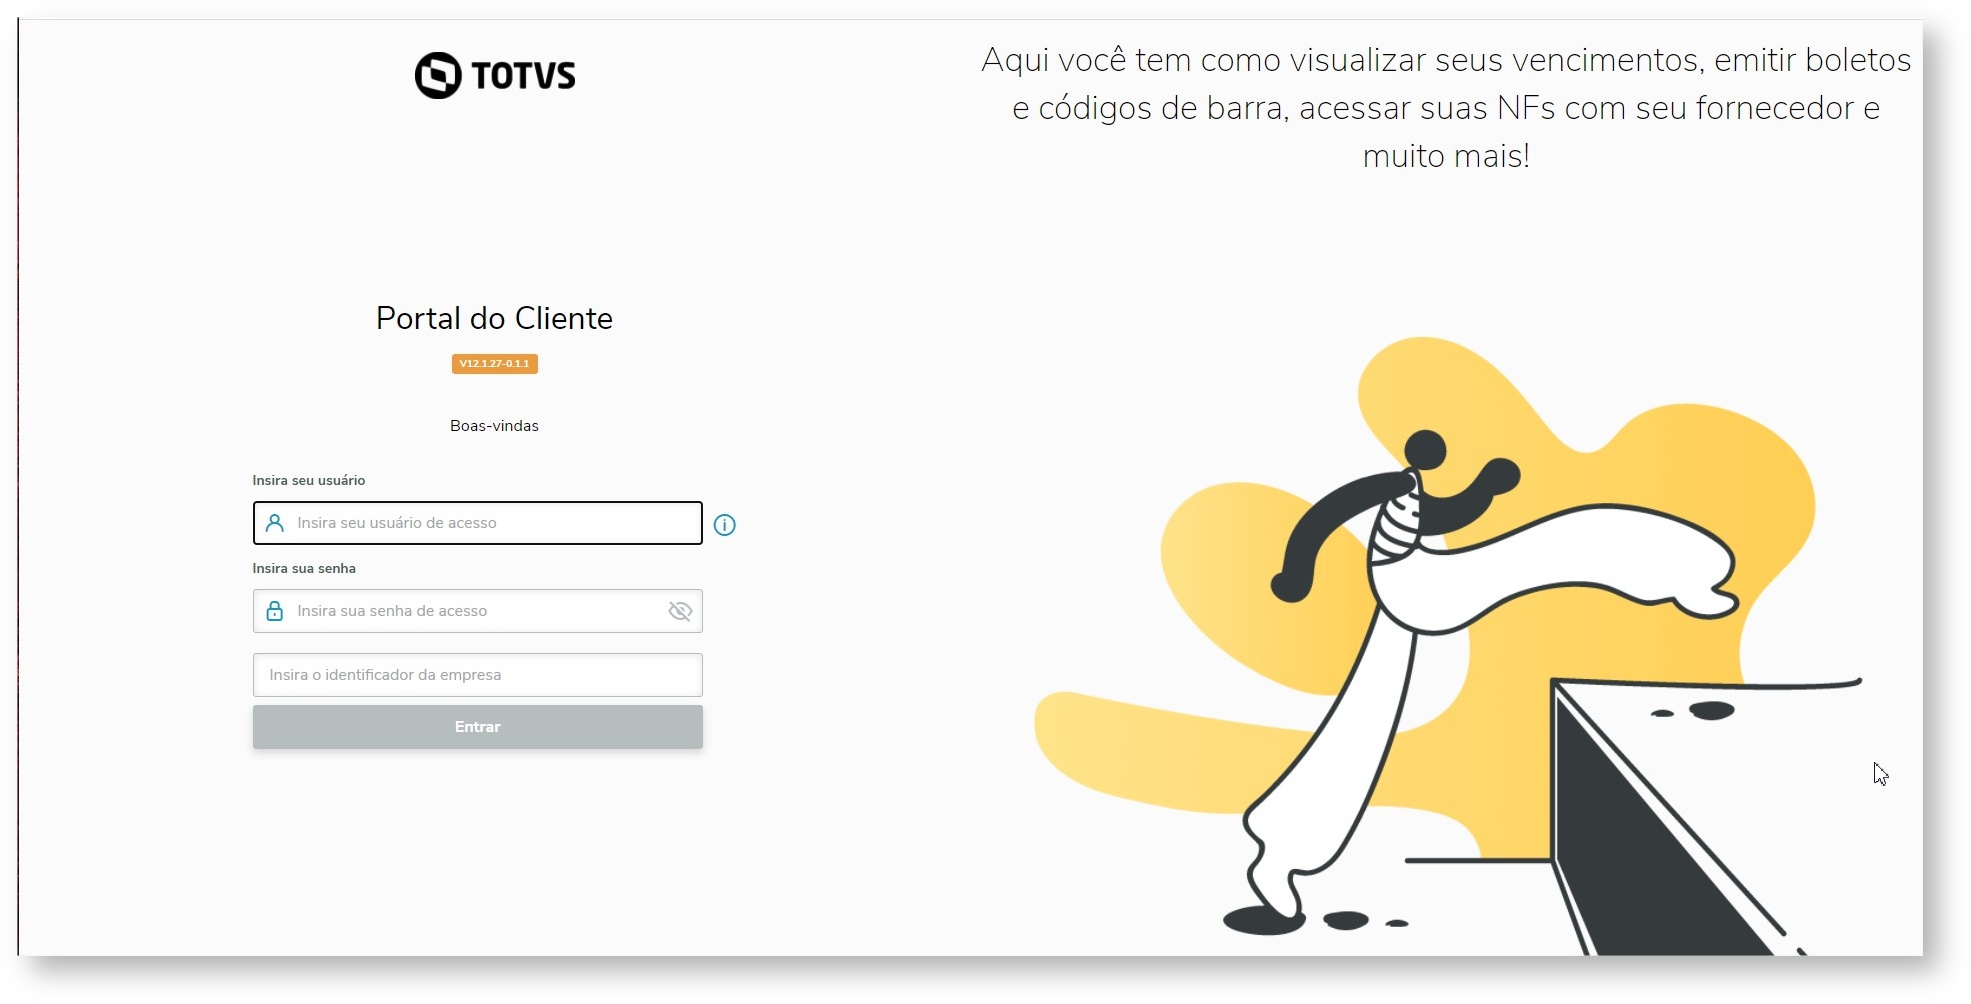
Login
Login homepage with these completion fields:
User: User login as created in the Portal Users Registration (FATA220).
Password: User password as created in the Portal User Registration (FATAL220).
Company Identification: ALIAS according to what is registered in the Mingle.
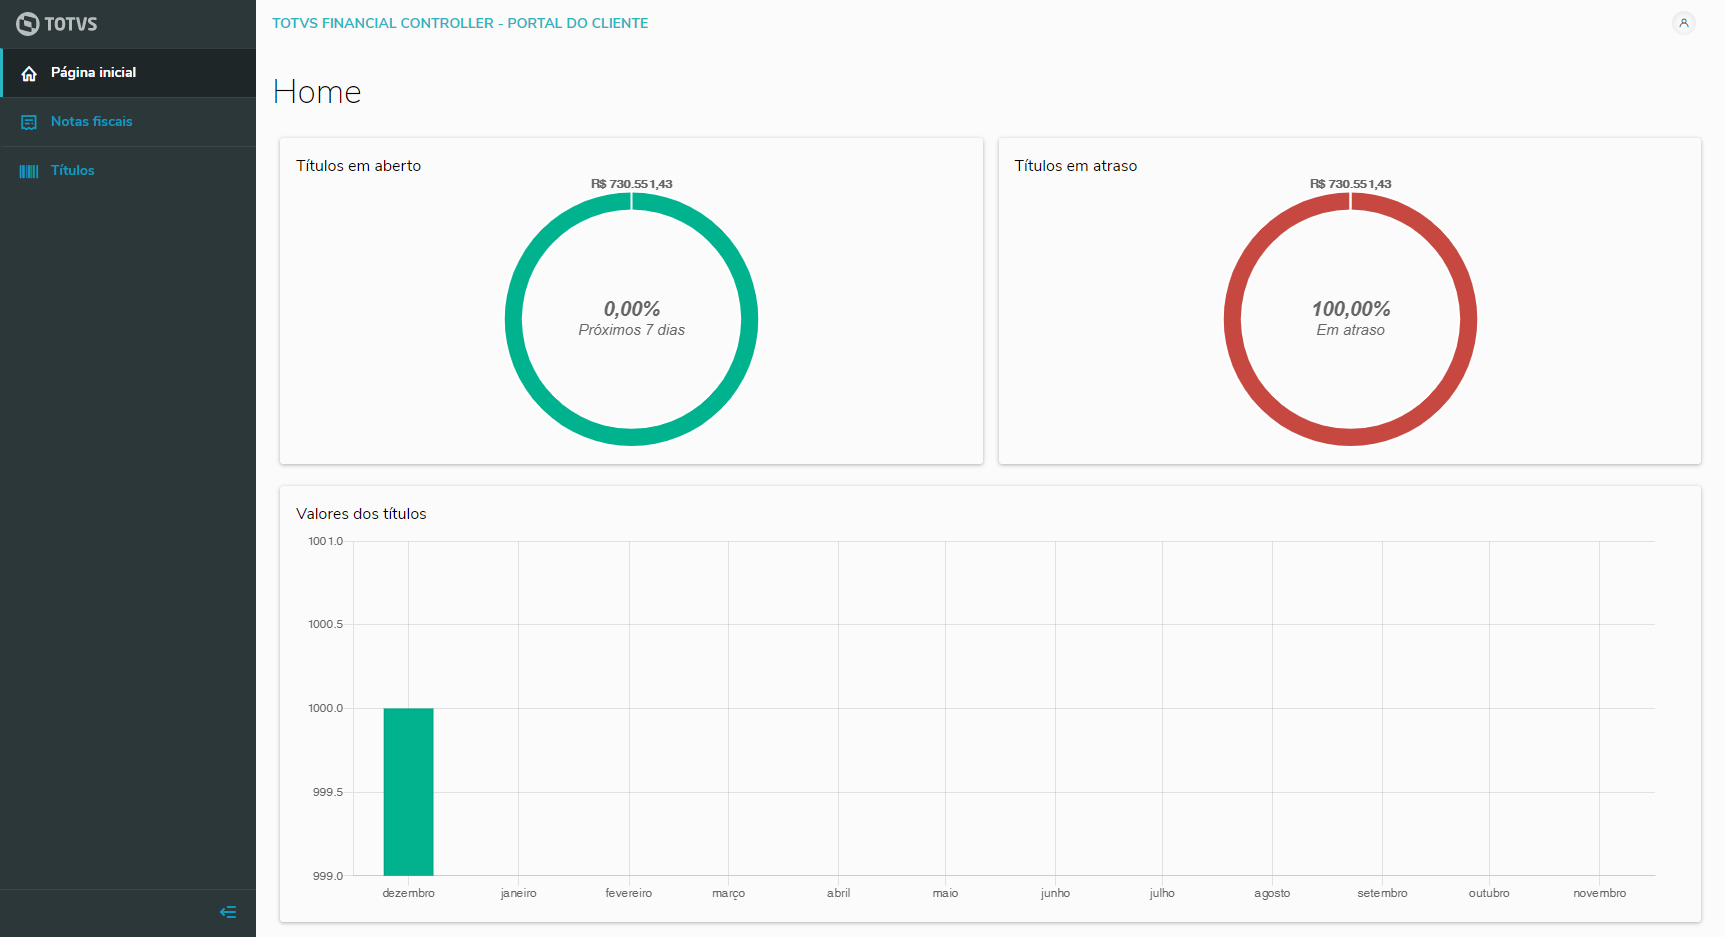
Home
Panel with financial information for quick view.
Outstanding bills: chart with percentage and values of the outstanding bills receivable.
Bills in arrears: chart with percentage and values of the bills receivable in arrears.
Values of the bills: chart with the total values per month of the bills receivable.
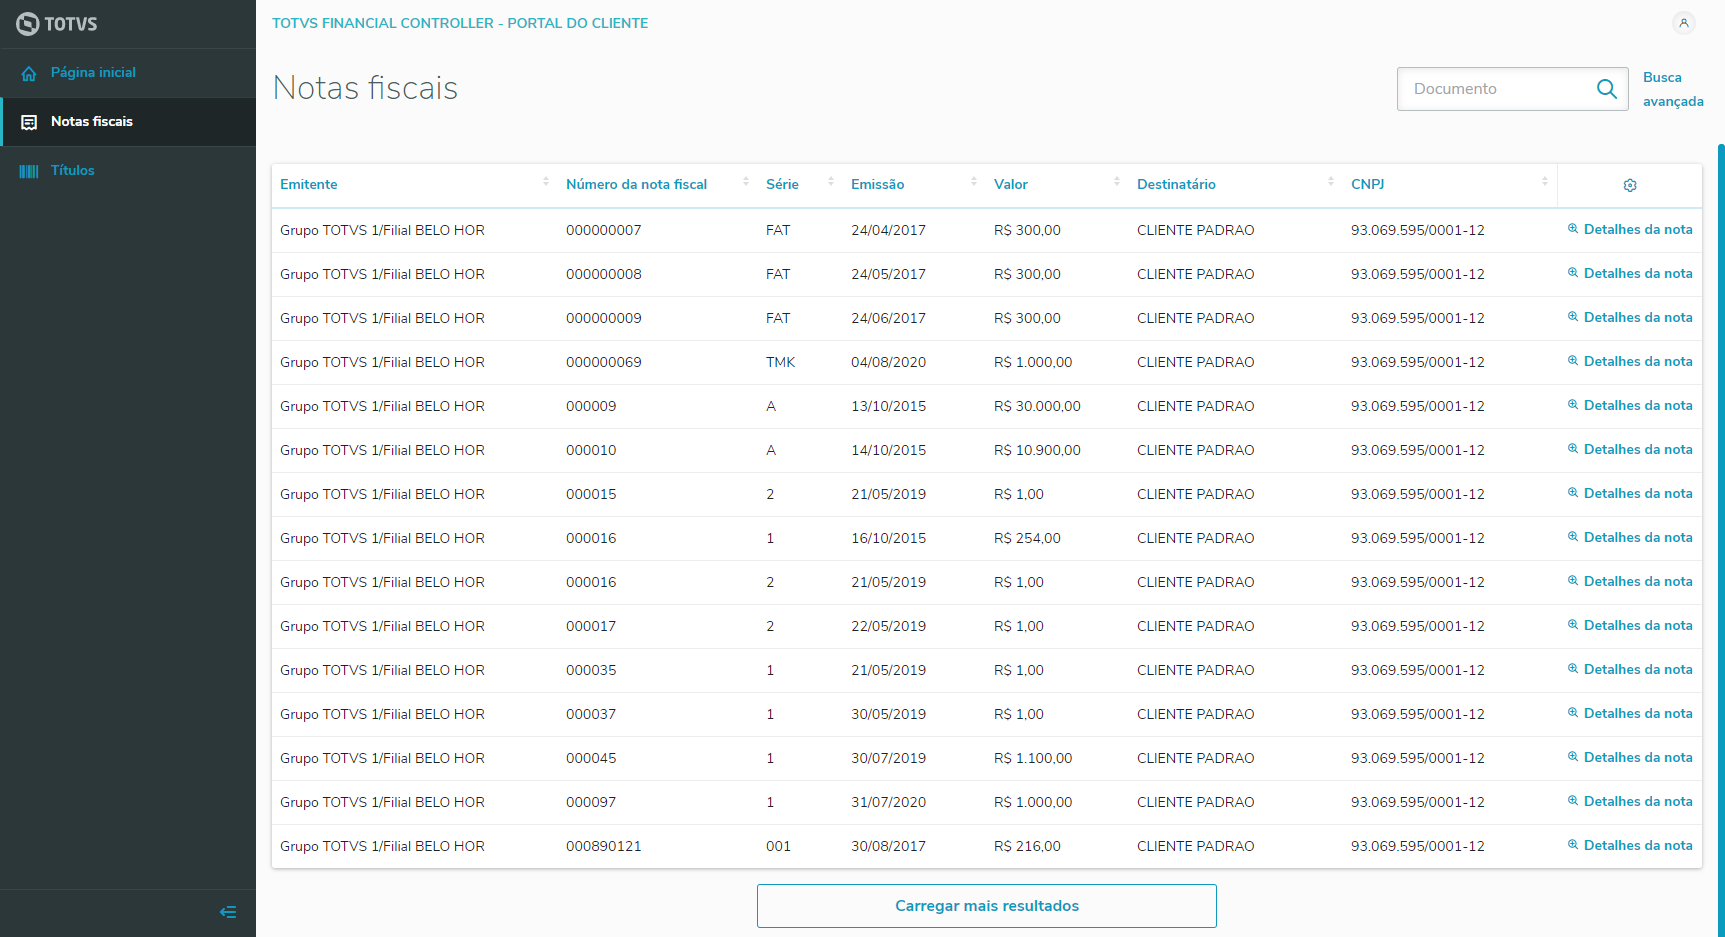
Invoices
List of Outgoing Invoices.
Advance search with the main fields.

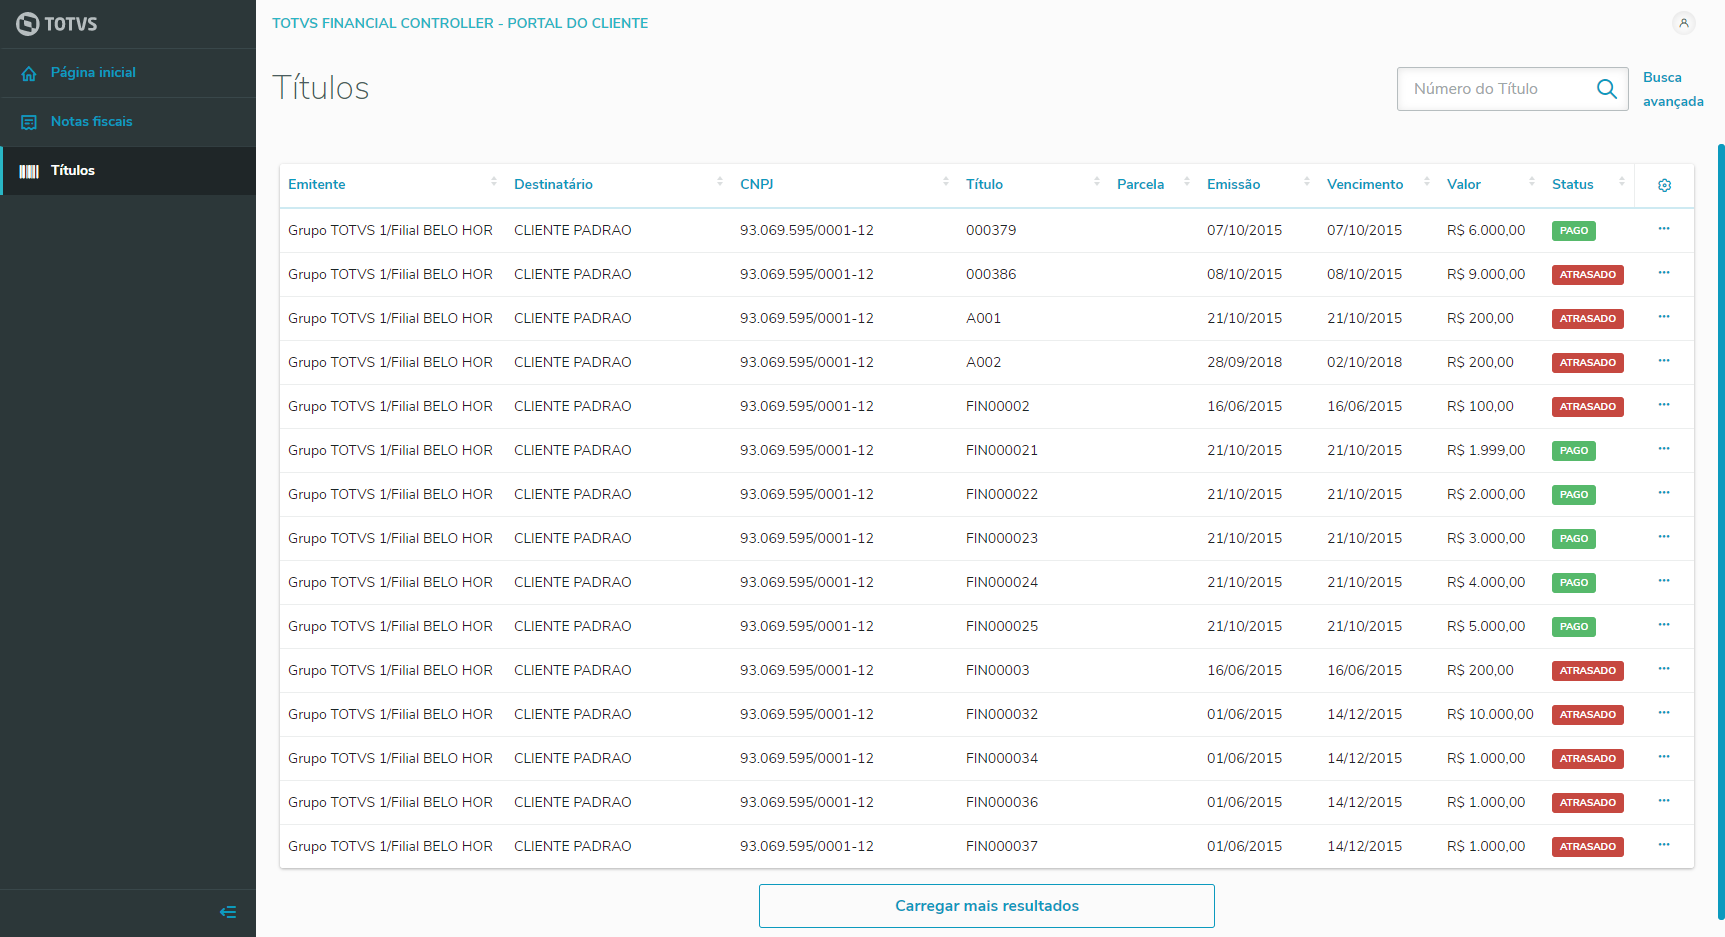
Bills
List of Outgoing Invoices.
Advance search with the main fields.

Data Selection
New feature to select branch and customer for the customer portal session. This resource affects data displayed in the portal, respecting the branches and customers selected.
After logging into the system, click on the user profile button, located at the top right of any screen, and select the "Data Selection" option.


User is redirected to the step by step of "Data Selection" to see theses steps: Branches, Customers and Confirmation.
Branches
In this step, the user can select one or more branches used in the portal.
Enter at least one branch.
After selecting the branches, click button Next to proceed with the next step.


Customers
In this case, select the customers of the branches. You can select one or more customers.
Enter at least one customer.
After selecting the customer, click button Next to proceed to the next step.


Confirmation
Last step of the process, in which the user view all the values selected in the previous steps, customers and branches. The records displayed are summarized by the customers selected with the customer's branches. To display branches, click customer record.
To finalize the process, click the Confirm button.
When confirming, the user will be redirected to the previous screen of the "Data Selection" request, that is, the screen the user was before clicking "Data Selection".


Visão Geral
Import HTML Content
Conteúdo das Ferramentas
Tarefas